Fraudulent activities can severely impact your WooCommerce store, leading to financial losses, chargebacks, and damage to your reputation. One effective way to combat fraud is by using the Blacklister Plugin, which helps block suspicious users, IP addresses, and transactions before they cause harm. And if you’re tailoring your store for international users, don’t miss this helpful guide on how to rename countries in WooCommerce from Design Flea. It walks you through the steps to customise country names in your checkout process—ideal for improving user experience and aligning with local preferences.
In this comprehensive guide, we’ll explore:
- The risks of fraud in WooCommerce
- How the Blacklister Plugin works
- Step-by-step setup and configuration
- Best practices for maximizing fraud protection
- Advanced strategies for blacklisting effectively
By the end, you’ll have a clear understanding of how to leverage this plugin to safeguard your online store.
1. Understanding the Risks of Fraud in WooCommerce
1.1 Common Types of Fraud in E-Commerce
Fraudsters use various tactics to exploit online stores, including:
- Credit Card Fraud – Stolen card details used for unauthorized purchases.
- Friendly Fraud – Buyers falsely claiming non-delivery to get refunds.
- Account Takeover (ATO) – Hackers gaining access to user accounts.
- Chargeback Fraud – Disputing legitimate transactions to get money back.
- Bulk Order Fraud – Placing fake bulk orders to test stolen cards.
1.2 The Financial and Reputational Impact
- Lost Revenue – Fraudulent transactions lead to direct financial loss.
- Chargeback Fees – Each disputed transaction incurs additional costs.
- Higher Payment Processing Fees – High fraud rates can increase fees.
- Damaged Brand Trust – Customers may lose confidence in your store.
1.3 Why Manual Fraud Prevention Isn’t Enough
Manually reviewing every order is time-consuming and inefficient. Automated tools like Blacklister help by instantly blocking known fraudsters.
2. Understanding and Implementing Blacklist Features in WooCommerce
Blacklist features serve as a frontline defense against fraudulent activities in your WooCommerce store. By implementing these powerful tools, you gain precise control over who can access and transact in your store, creating a secure shopping environment that protects both your business and legitimate customers.
1. IP Address Blacklists
- Functionality: Blocks specific IP addresses or entire ranges known for malicious activity
- Implementation:
- Manually add suspicious IPs from your order history
- Import lists from security services like Spamhaus
- Block entire ISP ranges from high-risk regions
- Best Use Case: Preventing repeat attacks from known fraudulent sources
2. Email Address Blacklists
- Functionality: Filters out disposable or suspicious email accounts
- Implementation:
- Block domains from temporary email services (Mailinator, Temp-Mail)
- Flag emails with suspicious patterns (e.g., random character strings)
- Integrate with email verification services
- Best Use Case: Stopping fraudulent account registrations
3. Phone Number Blacklists
- Functionality: Restricts orders from suspicious phone numbers
- Implementation:
- Block VOIP numbers commonly used in fraud
- Restrict country codes with high fraud rates
- Flag numbers with unusual patterns
- Best Use Case: Preventing phone-based verification fraud
4. Domain Blacklists
- Functionality: Blocks entire email domains associated with spam
- Implementation:
- Maintain updated lists of known spam domains
- Use wildcards to catch variations (@fraud-domain.)
- Best Use Case: Bulk prevention of fraudulent accounts
5. Location-Based Blacklists
- Functionality: Geo-blocks high-risk regions
- Implementation:
- Restrict countries with disproportionate fraud rates
- Allow exceptions for verified customers
- Combine with IP blacklists for accuracy
- Best Use Case: Reducing international fraud attempts
The Strategic Advantages of Blacklist Implementation
1. Enhanced Security Posture
- Reduces fraudulent orders by up to 80%
- Minimizes chargebacks and associated fees
- Protects against account takeover attempts
2. Operational Efficiency
- Automates 90% of fraud prevention tasks
- Reduces manual review time by 60-75%
- Integrates seamlessly with existing WooCommerce workflows
3. Financial Protection
- Prevents direct revenue loss from fraudulent transactions
- Reduces payment processing fees by maintaining low fraud rates
- Avoids costly chargeback penalties
4. Performance Optimization
Improves genuine customer experience
Blocks malicious bots that slow down your site
Reduces server load from fraudulent traffic
3. Setting Up Blacklister in WooCommerce with Aelia Blacklister for WooCommerce
The Aelia Blacklister for WooCommerce plugin allows you to easily manage and block specific customers based on various criteria, such as IP addresses, email addresses, phone numbers, and shipping addresses. By setting up Blacklists, you can improve your WooCommerce store’s security and prevent fraudulent or unwanted transactions.
Here’s a step-by-step guide to setting up Blacklists using the plugin:
Step 1: Install and Activate the Plugin
- Download the Plugin: First, purchase and download the plugin from Aelia Blacklister for WooCommerce.
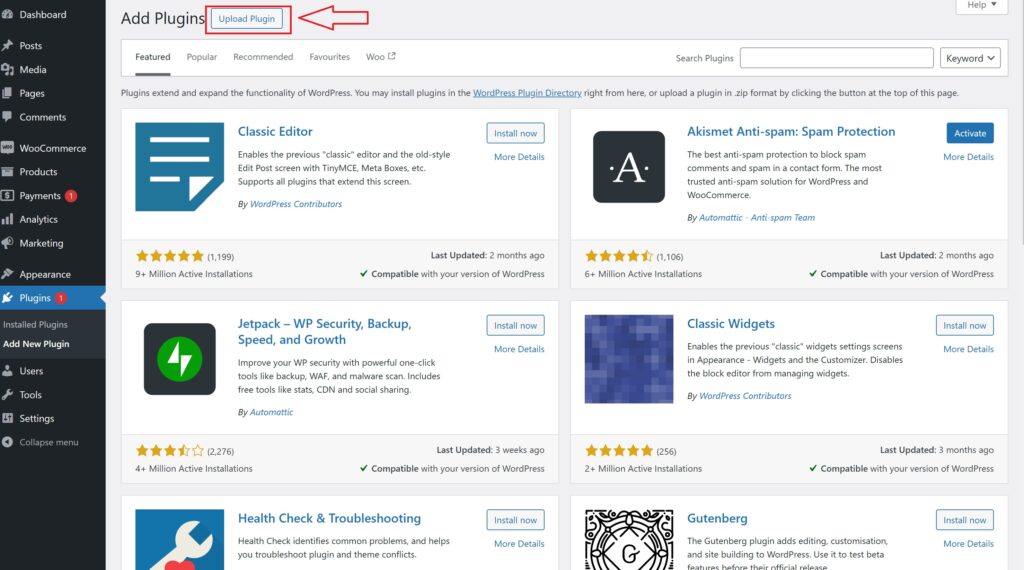
- Upload the Plugin: In your WordPress admin panel, go to Plugins > Add New > Upload Plugin. Select the downloaded .zip file and click Install Now.
- Activate the Plugin: After installation, click Activate to enable the plugin on your store.
Step 2: Access the Aelia Blacklister Settings
- Once the plugin is activated, navigate to WooCommerce > Settings in your WordPress dashboard.
- You will see a new tab titled Aelia Blacklister. Click on it to access the plugin’s settings.
Step 3: Define Blacklist Rules
- Add Blacklist Entries: In the Aelia Blacklister settings, you’ll find options to add rules for blocking customers based on various fields:
- Customer’s Name and Surname: Using regular expressions, you can block customers based on their full name or partial matches.
- Customer’s Address: Block customers from specific cities, states, or countries by setting the corresponding address field.
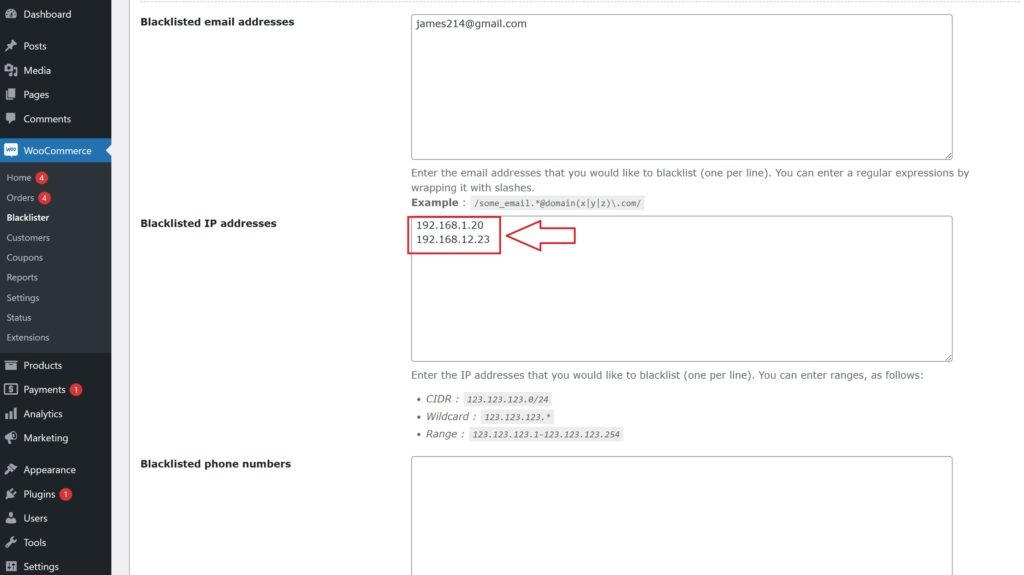
- Customer’s Email Address: Block specific email addresses or domains to prevent unwanted customers from completing the checkout process.
- Customer’s Phone Number: Block phone numbers from specific regions or individual numbers associated with suspicious behavior.
- Customer’s IP Address: Block specific IP addresses, or use IP address masks to block ranges of IPs.
- You can configure these Blacklist criteria using exact matches or partial matches (with regular expressions for all fields except IP addresses).
- Set Match Criteria: Decide whether you want to block customers based on exact matches or partial matches:
- Exact Match: The customer’s information must exactly match the Blacklisted data.
- Partial Match: Use regular expressions to match parts of a customer’s information, such as a domain name in an email address.
Step 4: Configure Error Messages
- Custom Error Messages: Customise the error message that will be shown to customers when they attempt to place an order using Blacklisted details. This ensures clear communication with blocked users about why their order could not be completed.
Step 5: Save Settings
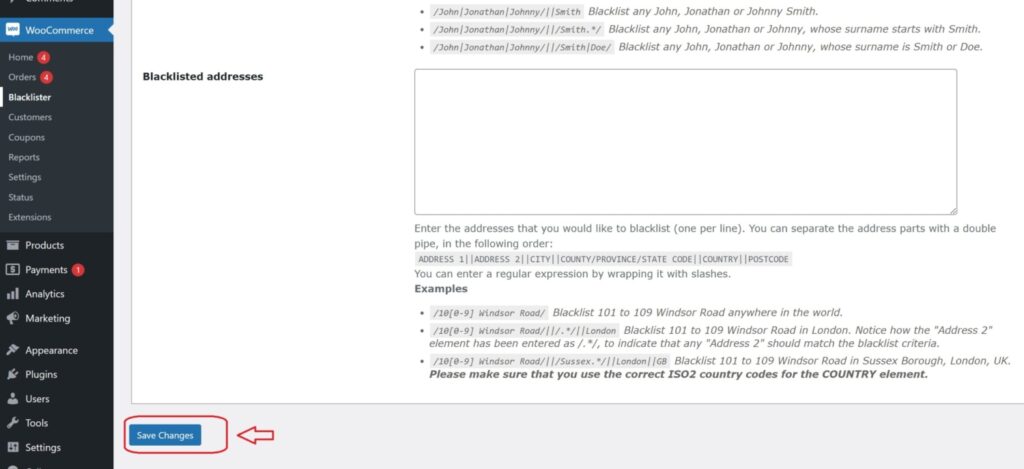
- After defining your Blacklist rules and customising error messages, click Save Changes to apply the settings.
Step 6: Test Blacklist Functionality
- To verify that the Blacklist is working properly, try to complete an order using details that match the blocked information (such as an email address, phone number, or IP).
- If configured correctly, the customer should be blocked from completing the checkout, and the custom error message will be displayed.
By setting up Blacklists with Aelia Blacklister for WooCommerce, you can easily block unwanted customers and prevent fraudulent transactions from occurring on your store. This not only enhances security but also ensures a smoother and more secure shopping experience for legitimate customers.
Once your store is protected from fraud, you might want to take it a step further by customising your pricing based on customer location. That’s where the Prices by Country for WooCommerce plugin comes in. This plugin enables you to automatically display different prices to users depending on their geographic region—an essential feature for any store with a global customer base. With geo-targeted pricing, you can optimise your conversions, account for currency variations, and stay competitive in international markets.
To fully streamline your global eCommerce setup, don’t forget to configure your shipping zones correctly. If you’re unsure where to start, check out this detailed guide on setting up shipping zones in WooCommerce from Design Flea. It’s a handy resource that walks you through the steps for defining zones and rates tailored to your customers’ locations.